How to Make a DIY Arc Lighter at Home
Readers, today I will be sharing a tutorial on how to make a homemade arc lighter using the tutorial found online. In place of a flame, an electric arc is used in these lighters to light things up on fire. This way they have proved themselves over time as modern, environmentally friendly alternatives to conventional lighters that one can use till they wear out. It requires that you come up with an easy assembly of common parts whose wiring is evident. As such you will be able to construct a working arc lighter which is secure and efficient if only it is done accurately.
How Arc Lighter Circuit Works
A high-voltage electric arc is created between two electrodes by an arc lighter circuit that can set materials on fire. This kind of circuit usually has an oscillator which is made of transistors. It is designed to make the transistor rapidly switch on and off, thereby causing a current of high frequency in the transformer. This transformer boosts voltage from a low voltage power source like 3.7V Li-ion battery to a level much more wild that leads to the formation of an arc.
When the switch is turned on, the circuit powered by an oscillator produces a changing current moving through the primary winding thereby inducing a high potential difference across the secondary winding which results in ionization of air surrounding the gap between electrodes leading to formation of a bright and visible electrical arc. The way this system operates determines how well it will work as well as its ability to keep people secure.
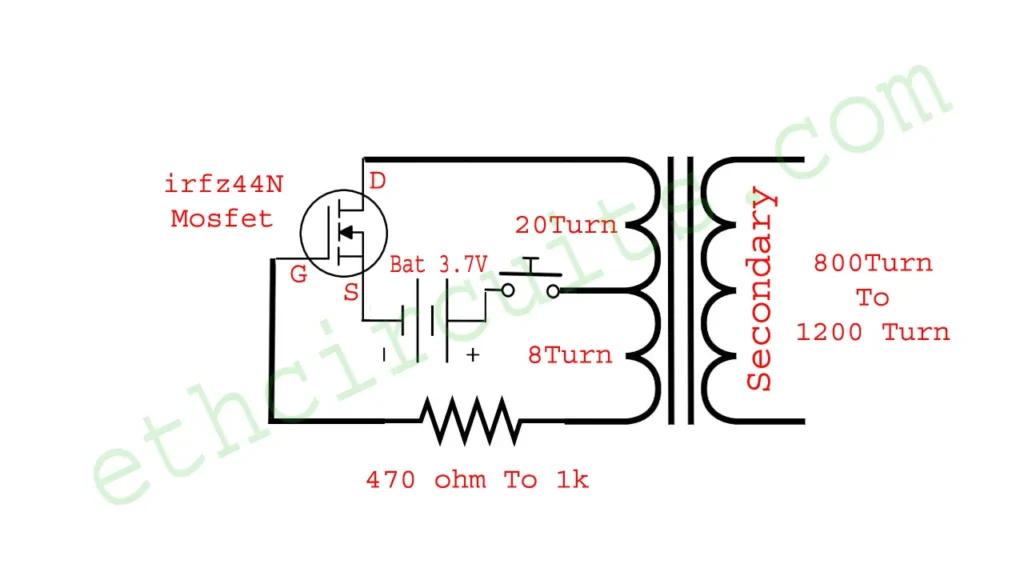
Diy Arc Lighter Circuit Diagram
The principle of an arc lighter is simple. It involves generating a high voltage electric arc to ignite materials. This is achieved with a simple oscillator circuit that steps up the voltage.
Parts List For Arc Lighter Circuit
To build this DIY arc lighter, you will need the following components:
- NPN Mosfet irfz44N– 1 piece
- Resistor 470 Ohm To 1kΩ – 1 piece (1/2 Watt)
- Ferrite Core Transformer – 1 piece
- Push Switch – 1 piece
- Battery (3.7V Li-ion) – 1 piece
- Connecting Wires
All these components can be found at your local electronics store or online.
Making the DIY Arc Lighter
- Collect the items: Be sure that you have everything mentioned above. Keep them organized on the workspace where you are going to do this.
- Knowing the System: The arc lighter circuit works by using a N Channel Mosfet to drive a high-frequency oscillator. This oscillator steps up the voltage using a ferrite core transformer to create the electric arc.
Assemble the Circuit:
- Transistor Connections: Connect the Source of the irfz44N Mosfet to the negative terminal of the battery.
- Transformer: Use a ferrite core transformer to step up the voltage. Connect the primary winding of the transformer to the drain of the Mosfet and the positive terminal of the battery. check circuit diagram for connection.
- Resistor: Connect the 470 Ohm to 1kΩ resistor with gate of the Mosfet and with transformer’s primary winding please check the circuit diagram for connection
- Switch: Place a switch between the positive terminal of the battery and the rest of the circuit to control the power.
- Arc Lighter Electrodes: Connect the secondary winding of the transformer to the arc lighter electrodes or use copper wires at output of transformer. These should be positioned close enough to each other so that an arc can form.
Testing the Circuit: After assembling the circuit, it’s time to test your arc lighter. Ensure all connections are secure, and then press the switch. If everything is connected correctly, you should see an electric arc form between the electrodes.
Assembly Instructions
- Mount the Components: For safety and durability, mount the components on a small piece of perfboard. This will keep everything in place and prevent short circuits.
- Insulate Exposed Wires: Use heat shrink tubing or electrical tape to insulate any exposed wires and connections. This will help prevent accidental shocks and short circuits.
- Secure the Electrodes: Ensure the electrodes are firmly secured and positioned correctly to generate a stable arc. You might use a non-conductive material to hold them in place.
Disclaimer
Safety First!
- High Voltage: The arc lighter generates high voltage, which can be dangerous. Handle with care and avoid direct contact with the arc.
- Fire Hazard: The arc can ignite flammable materials. Always use the lighter in a safe environment and keep away from flammable substances.
- Proper Insulation: Ensure all connections are properly insulated to prevent short circuits and electric shocks.
- Adult Supervision: If you are a minor, make sure to work under the supervision of an adult experienced in handling electronics.
By following these steps and safety guidelines, you can create a functional and safe DIY arc lighter.
Watch Video How To Make Arc Lighter Circuit
If you decide to build a homemade arc lighter, always remember to encompass all aspects of safety while making it. In home made lighter construction, you have to combine some elementary electronics in order to get this kind of modern and practical device as we will see. Without following the outlined steps that come with your project assembly guide or circuit design instructions, it is impossible for you to achieve your objectives. It is important for safety purposes that you prioritize caution when dealing with parts that have high voltage Happy building!”