IR Receiver Arduino Uno & IR Remote Decoder Full Detail
This is very interesting article with the help of this article first you can learn about IR Remote decoder using an Arduino and IR receiver.
This tutorial will cover everything from setting up the software to using the IR Receiver and decoding the signals . These signals can be used later for multiple projects including IR Remote control Robot , Home automation and similar IR controlled projects.
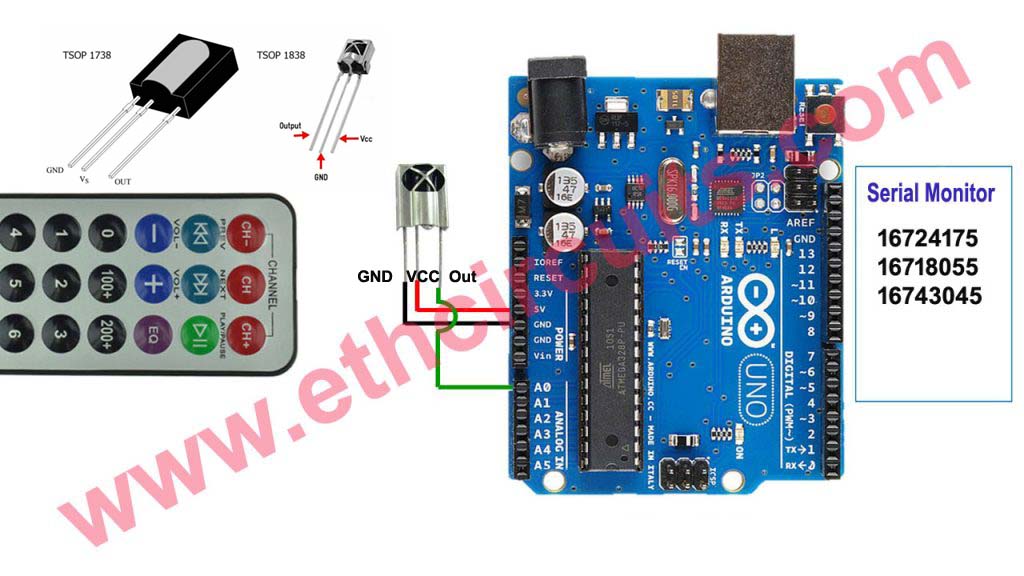
IR Sensor Connection For IR Receiver Arduino UNO
I am using TSOP1738 With Arduino UNO you can also use TSOP1838. 1st pin of TSOP1738 is negative supply pin connect this pin with Ground pin of arduino board
2nd pin of this sensor is Positive supply pin connect this pin at 5volt pin of arduino
3rd pin of this sensor is output pin connect this pin with arduino A0 pin or you can connect this pin with any of input pin of arduino but you have to change in code. Watch Video for detail

IRremote.h File Installation Guide For IR Receiver Arduino
For using IR applications first you need to add an IR library to your IDE or our program won’t work.
Download IRremote.h
Extract the downloaded file.
Copy the extracted folder.
Goto >> C drive >> Programs Files (x86) >> Arduino >> Libraries.
Paste the folder in Libraries.
That’s it IDE is ready to work with our code.
Watch 2nd Video for Details
This Touch Switch Circuit Diagram is built around a 555 timer by making use of the default properties of the Pins of the 555 Timer IC. With the help of this circuit, you can turn ON and OFF a device by Read More….
IDE Code for Decode Remote Control
Just Copy and Paste This Code Into your Arduino IDE Software
#include <IRremote.h>
int RECV_PIN = A0;
IRrecv irrecv(RECV_PIN);
decode_results results;
void setup(){
Serial.begin(9600);
irrecv.enableIRIn();
}
void loop() {
if (irrecv.decode(&results)) {
Serial.println(results.value, DEC);
delay(100);
irrecv.resume();
}
}
How To Decode Remote Control With Arduino UNO Watch Video
1 To 10 Channel IR Receiver Arduino UNO Remote Receiver
Once You Decode The Remote Button write all the code and put into your arduino receiver code file. First you have to install IRremote.h File in you Arduino Software IDE Watch Full Video For Detail
Arduino Connection with Relay Diagram For 220 Volt Appliances
In This Diagram I showed How you connect Relay with Arduino. You can use any NPN Transistor With Arduino like BC547/548 2n2222 etc.. But check pinout First.
Connect Base of Transistor with 470 ohm Resistor at Output PIN of Arduino And connect all transistor emitter Point and give Negative Supply.
Connect Relay Coil Point with Positive Supply and With Transistor Collector and check circuit diagram for 220 volt connection of Relay. I Showed here only 3 Connection You can Connect Relays according to your need as per circuit diagram.

Ir Remote Receiver Code Just Copy and Paste
#include <IRremote.h>
#define irPin A0
IRrecv irrecv(irPin);
decode_results results;
#define r1 1
int relay1 = LOW;
#define r2 2
int relay2 = LOW;
#define r3 3
int relay3 = LOW;
#define r4 4
int relay4 = LOW;
#define r5 5
int relay5 = LOW;
#define r6 6
int relay6 = LOW;
#define r7 7
int relay7 = LOW;
#define r8 8
int relay8 = LOW;
#define r9 9
int relay9 = LOW;
#define r10 10
int relay10 = LOW;
void setup()
{
irrecv.enableIRIn();
pinMode(r1, OUTPUT);
pinMode(r2, OUTPUT);
pinMode(r3, OUTPUT);
pinMode(r4, OUTPUT);
pinMode(r5, OUTPUT);
pinMode(r6, OUTPUT);
pinMode(r7, OUTPUT);
pinMode(r8, OUTPUT);
pinMode(r9, OUTPUT);
pinMode(r10, OUTPUT);
}
void loop() {
if (irrecv.decode(&results)) {
switch (results.value) {
case 16754775:
digitalWrite(r1,0);
digitalWrite(r2,0);
digitalWrite(r3,0);
digitalWrite(r4,0);
digitalWrite(r5,0); //all off
digitalWrite(r6,0);
digitalWrite(r7,0);
digitalWrite(r8,0);
digitalWrite(r9,0);
digitalWrite(r10,0);
delay(100);
break;
case 16724175:
relay1 = ~ relay1;
digitalWrite(r1,relay1);
delay(100);
break;
case 16718055:
relay2 = ~ relay2;
digitalWrite(r2,relay2);
delay(100);
break;
case 16743045:
relay3 = ~ relay3;
digitalWrite(r3,relay3);
delay(100);
break;
case 16716015:
relay4 = ~ relay4;
digitalWrite(r4,relay4);
delay(100);
break;
case 16726215:
relay5 = ~ relay5;
digitalWrite(r5,relay5);
delay(100);
break;
case 16734885:
relay6 = ~ relay6;
digitalWrite(r6,relay6);
delay(100);
break;
case 16728765:
relay7 = ~ relay7;
digitalWrite(r7,relay7);
delay(100);
break;
case 16730805:
relay8 = ~ relay8;
digitalWrite(r8,relay8);
delay(100);
break;
case 16732845:
relay9 = ~ relay9;
digitalWrite(r9,relay9);
delay(100);
break;
case 16738455:
relay10 = ~ relay10;
digitalWrite(r10,relay10);
delay(100);
break;
}
irrecv.resume();
}
}

